Forcing SSH-MFA Two-Factor Authentication_v4.1.x
How to force Multifactor Authentication when someone uses SSH to access a server or container protected by ZeroLock®.
Ensuring usage of SSH-MFA two-factor authentication requires a multi-step process simplified by the ZeroLock Management Console (ZMC).
The process consists of:
- Create and Add a New Rule
- Create a New Control Policy
- Create a New Endpoint Configuration Profile
- Applying a Configuration Profile to an Endpoint
Create and Add a New Rule
- In the ZeroLock Management Console (ZMC) go to the Control Policies | Rules page then click Actions | Add New Rule.

- The New Policy Rule screen is where the name, description, and rule type are entered. On entering the Rule Type from the drop-down menu, the screen expands as shown. Complete these using the table below then select CREATE.


Rule Name
Authenticate all SSH connections
Description
This rule will force SSH MFA for all assigned Endpoints
Rule Type
SSH-MFA
IP Address
Leave as default
Day/Time
Leave as default
Start/End
Leave as default
Action
Authenticate
Create a New Control Policy
- As shown below, go to the Control Policies | Policies page and click Add New Policy.

- The New Policy Rule screen is where the name, description, and rule type are entered. On entering the Rule Type from the drop-down menu, the screen expands as shown. Complete these using the table below then select CREATE.
Name
Force SSH Authentication
Description
This policy will force SSH authentication to all assigned endpoints.
Add Rules
Clicking the Add Rules button brings up the Policy Rules screen.

- On the Policy Rules screen, use the TYPE drop-down menu to select the type of rule you want. Select SSH-MFA to bring up all those rules.

- Scroll down until you locate the newly created rule, Force SSH Authentication, click the checkbox to select that rule, and then click ADD SELECTED.

- Clicking the Add Selected button returns you to the New Policy screen where selecting the CREATE button completes the creation of the new policy.

Create a New Endpoint Configuration Profile
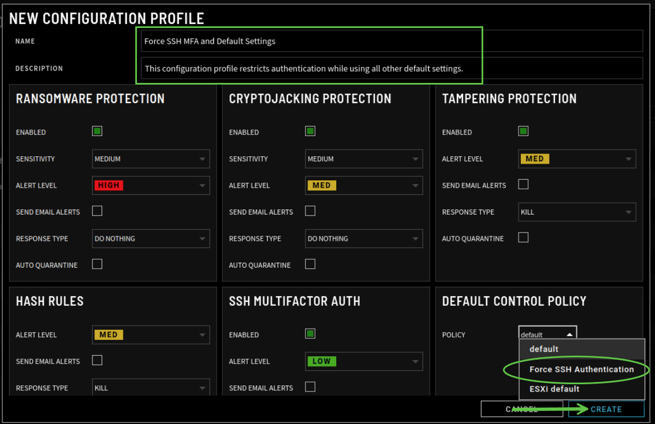
- Go to the System Configuration | Config Profiles page and click Add New Profile.

- Using the table, complete the required entries then click CREATE.
Name
Force SSH MFA and default settings
Description
This configuration restricts authentication while using all other defaults.
Default Control Policy
Force SSH Authentication

Assign the Configuration Profile to an Endpoint
- Select Endpoints from the menu then the endpoint(s) to which you want to assign the new configuration policy. Click on the Actions drop-down and select Set Endpoint Config(s).

- Select the new configuration: Force SSH MFA and default settings and click Set Configs.

- From the Endpoints screen, you should be able to see the assigned Profile.

Test the SSH MFA Authentication Configuration
SSH to the assigned endpoint to verify that the two-factor authentication requirement works.
