Implementing SSH Multifactor Authentication Using Multiple, Layered Rules_v4.1.x
How To Implement Multifactor Authentication (MFA) for SSH Connections.
Implementing SSH-MFA using multiple, layered rules allows for more granular Access Control such as controlling who and when endpoints may be accessed. This process requires four (4) primary steps:
Rules Creation
In this example we are going to create two new policy rules:
- All IP addresses and all users must authenticate at all times.
- Specific IP addresses on specific days and at specific times do not require authentication.
Example Policy Rule #1
All IP addresses and all users must authenticate at all times.
- Using the ZeroLock® Management Console (ZMC) go to CONTROL POLICIES | RULES. The default rule currently allows all connections without any SSH authentication. We want to change that to require authentication.

- To create a rule requiring SSH Authentication, go to CONTROL POLICIES | RULES, then select ACTIONS drop-down menu. From that menu click Add New Rule.

- When creating a new policy rule, it is recommended the Name and Description of the rule are clear and concise, so its function is easily understandable. As this policy rule will require all IP addresses and users to authenticate at all times, the IP address and User fields are left blank, meaning the rule applies to all.

- From the Rule Type drop-down menu, select SSH-MFA then CREATE. The first rule has been created.

Example Policy Rule #2
Specific IP addresses on specific days and at specific times do not require authentication.
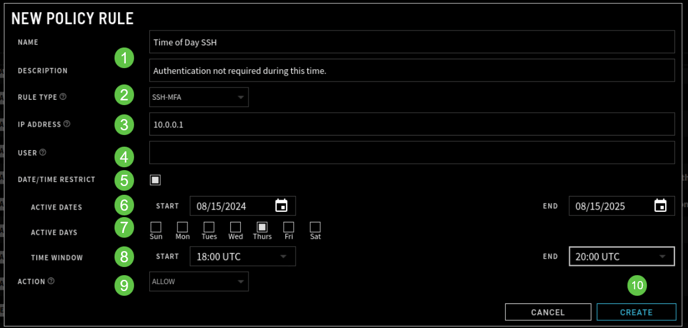
We also want to create a rule that is more specific but will NOT require SSH for a specific IP address on a specific hour of the day and a specific day of the week. This will be our Time-of-Day Rule. This type of rule may be needed for a maintenance window for a tool or appliance requiring SSH access.
Rule requirements:
- Time of day requirement = 2200-2300
- Only from this IP address = 10.0.0.1
- Only on Thursdays
Return to the Actions | Add New Rule to create a Time-of-Day requirement.

- As before, ensure the Name and Description of the rule are clear and concise, so its function is easily understandable.
- Again, the Rule Type is SSH-MFA.
- This is the source IP address of the person logging in.
- Use this field if the user logging is to be a specific user.
- Select the checkbox, as this rule will apply Date and Time restrictions.
- Select the start and end dates for applying this rule.
- The day(s) of the week that the rule is active.
- The start and end hours during which the rule is active.
- Specify the actions that are to be taken if the rule is triggered. Select Allow.
- Allow – the SSH session continues as normal.
- Authenticate – causes the SSH session to be subject to authentication.
- Reject – terminates the session immediately.
- Select CREATE to create the rule.
Policy Creation - using the example policy rules created above
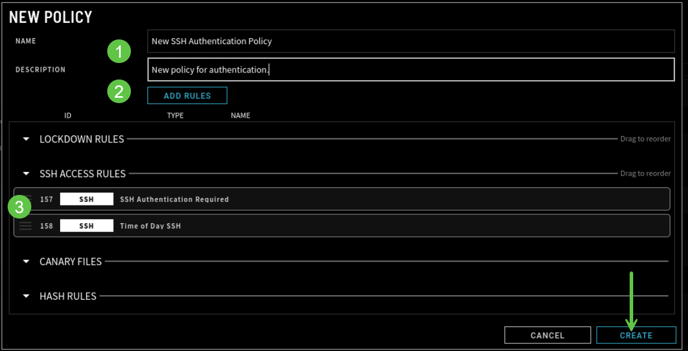
Policies consist of rules, so to create a new SSH authentication policy, we will add the two (2) rules we just created. This requires navigating to Policies | Add New Policy.
- Enter the Name and Description of the policy.
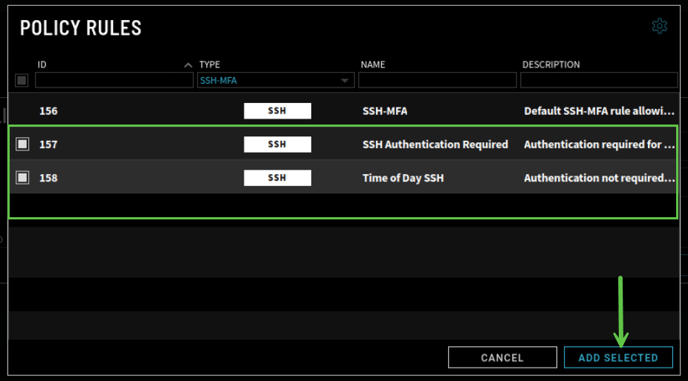
- Select Add Rules. On the Policy Rules screen, select the rules we just created and click Add Selected.


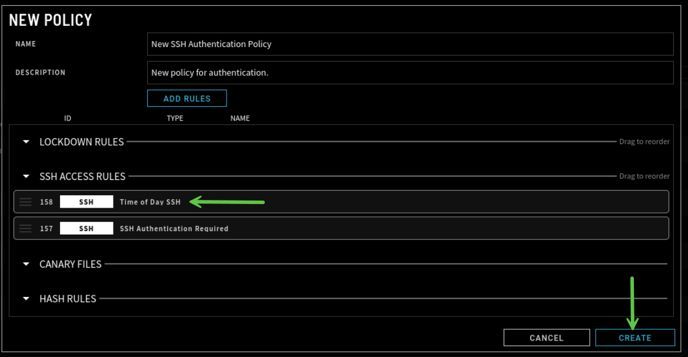
Order matters in how rules function. It works like a firewall where the top rule is checked first, if that rule meets the criteria, it is triggered, and no other following rules are read.
To ensure the time-specific rule is applied, we have to place it first, so it’s read first. If we don’t, the first rule read will be the rule requiring authentication at all times of day and our Time-of-Day rule will be ignored.
Always have the more restrictive rules first, followed by the less restrictive ones with the least restrictive and default rules towards the bottom so there are always rules to fall back on.

Policy Assignment
The final step is to assign the newly created SSH authentication policy to an Endpoint.
- Go to Systems Configuration | Config Profiles | Add New Profile as shown below.

- On selecting Add New Profile, the New Configuration Profile screen appears.

- Add a Name and Description for this profile.
- In the Default Control Policy box, click on the Policy drop-down and select the new policy you just created.
- Select Create to complete the process.
Adding Policy to Endpoint
Once the configuration profile has been created, we have to apply it to an Endpoint.
- Navigate to the Endpoints screen, select which endpoint you want to apply the new profile to, and click Actions. On the drop-down select Set Endpoint Config.

- Select the profile, then click Set Configs.

- Once the button is clicked, all the rules and policies that were created are applied to this endpoint.

You have successfully applied a new policy to an endpoint.