
How to Quickly and Easily Modify an Endpoint Group using the ZeroLock Management Console
There may be times when you will want to make changes to an Endpoint Group you've created. Modifying may be done by either selecting the box at the beginning of the row or clicking anywhere along that row and selecting Edit.

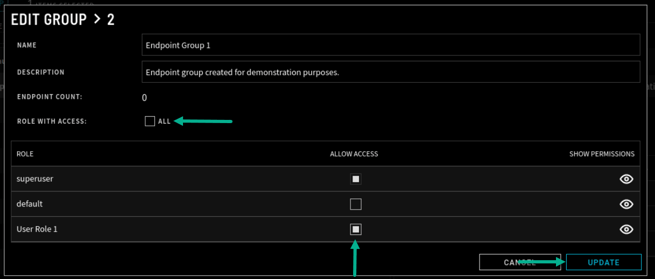
- Selecting the All box will allow all User Roles to have the same permissions currently set for this Endpoint Group. The "superuser" role must have access to all Endpoint Groups and is selected with full rights by default.
- To customize the rights for each User Role, click the Eye Icon to expand the specific options for that User Role. Select any boxes for specific features you want users with that role to have access to control within this new Endpoint Group. The options relate directly to different features on the Endpoints and Alerts pages. The options are:

1
Change Endpoint Version
Gives access to both the Update Agent Version and Re-install Agent Version features, which allow users to revert an endpoint's agent version to a previously installed version.
2 Deactivate Endpoint Protection
Turns off but does NOT uninstall the ZeroLock Agent, which is what provides the protection to the endpoint.
This option allows the reactivation of the agent and subsequent protection of the endpoint. The endpoint status light will briefly turn red indicating the endpoint is offline and unprotected. The status will quickly change to yellow meaning it’s connected but unprotected.
3 Activate Endpoint Protection
Immediately returns the endpoint to a state of protection (status = green).
4 Uninstall Agent on Endpoint
Immediately place the endpoint offline and in unprotected (status = red). To re-install the agent, follow the steps outlined in ZeroLock Agent Installation.
5 Archive Endpoint
Gives access to the Archive Endpoint feature, which allows users to archive an endpoint, permanently removing it from the Endpoints page. This can only be done after an endpoint has been shut down.
6 Send Queries
The query entry filed is accessed by double-clicking on an endpoint on the Endpoints page then selecting the Maintenance tab.
The Endpoint Query field provides a variety of in-depth options to gather details about the status of an endpoint and the agent actively running on it.
7 Change Configuration Profile
Gives access to the Set Endpoint Config feature, which allows users to set the Configuration Profile that the endpoint will follow.
Endpoints may only be assigned one Configuration Profile at a time.
8 Change Endpoint Groups
Gives access to the Add Group and Remove Group features, which allows users to add or remove Endpoint Groups that each endpoint is assigned to, controlling the users that can view and modify each endpoint.
Endpoints may be assigned to multiple Endpoint Groups.
9 Manage Endpoint Quarantine
Gives access to the Quarantine Endpoint and Unquarantine Endpoint features, which allow users to isolate endpoints that are dealing with active threats to prevent lateral movement.
Manual quarantines may be done for a predetermined amount of time or indefinitely.
Endpoints that have been quarantined either manually or automatically due to detected threats can be unquarantined with this feature.
10 Shell Access
Gives access to a bash shell on the endpoint to run basic commands without having to manually log into the endpoint.
This is accessible by double-clicking on a specific endpoint on the Endpoints page to access the Endpoint Details page and clicking on the Shell tab.
Alerts Page
11 View Alerts
Populates the users' Alerts page with all alerts on endpoints that are assigned to this Endpoint Group.
12 View Alert Details
Allows the capability to view the details of an alert, accessible by double-clicking on any alert on the Alerts page to access the Alert Details page.
13 Respond to Alerts
Gives users the capability to respond to suspended alerts. Options are to Kill & Remediate the process or Release the suspension and allow the process to continue.
- Once all User Roles and rights are assigned as desired, click Create to create the Endpoint Group and save the settings you have applied.
