Overview
The System Settings screen has five (5) sections with ten (10) nested, editable blocks. Selecting Edit in the upper right corner of a section will open that section for editing.

Section 1
Edit Window
When done editing, select UPDATE to save any changes in this section.

Service Provider Config
The administrator uses the values in this section to configure the ZeroLock Server application (ZeroLock Management Console) for your SSO IDP (Identity Provider). The entries below are for example only and will not be the same for each client/organization.

- Entity ID – is a globally unique name for a SAML (Security Assertion Markup Language) entity, i.e., your Identity Provider (IdP) or Service Provider (SP).
- Reply URL – is where the authorization server sends the user once the app has been successfully authorized and granted an authorization code or access token.
Identity Provider
The Identity Provider Config consists of four (4) fields:
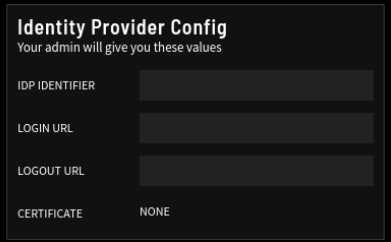
- IDP Identifier – is the name of the identity provider. The IDP is the service that stores, creates, and manages digital identities. In other words, it offers user authentication-as-a-service.
- Login URL – the locator of a resource. This is used to locate the address of a resource on the Internet.
- Logout URL – sends a logout request to the OAuth provider to log out of the provider while logging out the user from the application.
- Certificate – represents that a certificate authority has verified that the web address belongs to the organization. If you have a certificate, click Select File to open its file location.
Section 2
Edit Window
When editing is complete, selecting 'UPDATE' will save any changes made in this section.

Date / Time
The Date/Time Display Preferences has three (3) fields.
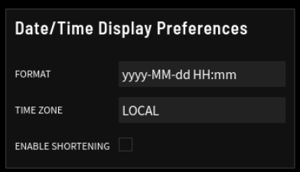
- Format – The menu options are yyyy-MM-dd HH:mm or yyyy/MM/dd HH:mm.
- Time Zone – The options in the drop-down menu are Local or Zulu.
- Enable Shortening – If the checkbox is white, the timestamps displayed in some tables will switch to an “ago” format, where the user is shown how much time has passed since the event occurred rather than the timestamp itself.
- For example, the Activity Log tracks every user’s activity using a default time setting of yyyy-MM-dd HH:mm.

- However, if Enable Shortening is selected, only the number of seconds, minutes, or hours since the activity occurred is displayed.

- For example, the Activity Log tracks every user’s activity using a default time setting of yyyy-MM-dd HH:mm.
General
The General block has two (2) fields:
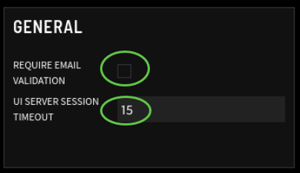
- Require Email Validation – If the checkbox is white, it is enabled. Email validation is a method of determining whether or not an email address is reachable and valid. It also verifies whether a specific email address is associated with a reputable domain.
- UI Server Session Timeout - The options are 5, 15, or 30 minutes.
The Email block configures the email for sending system-generated emails, such as Alerts. This block has seven (7) editable fields and a Send Test Email button.
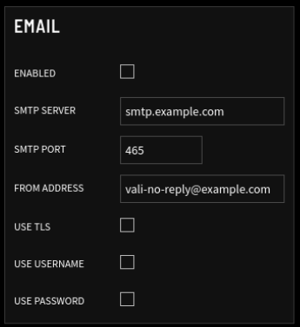
- Enabled – If the checkbox is white, sending an email is enabled.
- SMTP Server – The name of the SMTP (Simple Mail Transfer Protocol) server.
- SMTP Port – The assigned port for SMTP.
- From Address – The email address sending the Alert.
- Use TLS – If the checkbox is white, TLS (Transport Layer Security) is used, and the data sent will be encrypted.
NOTE: If using port 465, the TLS box should be checked (white). If using port 587, the TLS option should not be checked.
- Use Username – If the checkbox is white, a username is required.
- Use Password – If the checkbox is white, a password is required.
HTTP TRANSPORT
This section configures the ZMC to securely send data to an outside source for log management and analytics.

Enabled - If the checkbox is white, HTTP Transport ability is active.
Hostname - Is the name of the external server being used.
Port - The port being used. The default is 443 or, for demo instances, 8088.
Use TLS - If the checkbox is white, TLS is enabled.
Path - The path to the data being sent. By default, this will usually be /service-path.
AUTH Header - Provides credentials that authenticate the user to the server.
Username - The User's name.
Password - The User's password.
Proxy Server – The URL and port of the proxy server.Example: 10.100.1.56: 3128
MS Workspace ID – the unique identifier for an Azure Log Analytics workspace.
MS Primary Key - is a secure authentication token used to authenticate requests when pushing data into Azure.
VEEAM API
ZeroLock supports sending alert activity data to the Veeam API integration. This functionality enables Veeam to detect when an alert is generated and identify potentially affected VMs. This information can then be used to assess the validity of VM backups.
This section configures the communication between ZMC and the VEEAM server.

- Hostname - of the VEEAM server.
- Port – The port used to communicate.
- Username – Name of the user that has the Incident API User role.
- Password – User’s password.
- TEST - Enables testing of the communication configuration.
This is an example of the alert activity data sent to the VEEAM server.

Section 3 – Backup Configuration
Edit Window
Select Update to save editing changes in this section.

Backup Config
Backup file location: ~/zerolock-server/database/mariadb/zerolock-server-backup

Backup is not enabled by default; it must be enabled manually.
There are four (4) editable fields:
- Enabled - A white checkbox indicates that the system configuration backup is enabled.
- Interval - When enabling the system configuration backup, the drop-down menu is activated. The menu offers four (4) interval options: Hourly, Daily, Weekly, and Monthly.
- Retention Period – The number of system back-ups that will be retained. For example, entering ‘5’ will only keep the most recent 5 backups. On the 6th backup, the oldest backup will be deleted. If left blank, all backups will be retained.
- Next Datetime - This is when the next backup is scheduled. The format is mm/dd/yyyy and hh:mm (a|p)m.
When editing is complete, select UPDATE.

Section 4 – Activity Data Retention Configuration
Edit Window

There are four (4) editable fields:

Enabled - If the box is white, Activity Data retention is enabled.
Interval - Enabling retention of Activity Data activates the drop-down menu. The menu offers four (4) interval options: Hourly, Daily, Weekly, and Monthly.
Next Datetime - The schedule of when the backups will begin. The format is mm/dd/yyyy and hh:mm (a|p)m.
Retention Period – The length of time the Activity Data is retained. The menu offers five (5) options: Keep Last 6 months, 3 months, a week, or the last day.
Section 5 – Alert Data Retention Config
Edit Window

There are five (5) editable fields:

Enabled - A white box indicates that retention of Alert Data is enabled.
Interval - Enabling retention of Alert Data activates the drop-down menu. The menu offers four (4) interval options: Hourly, Daily, Weekly, and Monthly.
Next Datetime - The schedule of when the backups will begin. The format is mm/dd/yyyy and hh:mm (a|p)m.
Retention Period – The length of time the Activity Data is retained. The menu offers five (5) options: Keep Last 6 months, 3 months, a week, or the last day.Select Alert Type(s) – The alert types whose data will be retained. The menu offers eight (8) options:
- Blocked
- Cryptojacking
- File Access
- Network Access
- Program Execution
- Ransomware
- SSH-MFA
- Tampering
Note: If the Select Alert Type field is left blank, the system will automatically add all eight (8) types to be deleted.