Alerts Homepage on the ZeroLock® Management Console_v4.1.x
Overview of the Alerts Homepage on the ZeroLock® Management Console
Overview
The Alerts homepage is the gateway to detailed information on alerts. In addition to providing information, this page enables management of all alerts, active or inactive.

An alert is generated when ZeroLock detects system behavior that meets criteria set forth by previously configured Control Policies and Rules.
There are two (2) types of alerts: Active and Inactive
- Active – Active alerts status will be “Detected” and will have two (2) visible buttons to choose from in the Actions column on the far right - Kill or Release.
- Inactive - An inactive alert is when action has already been taken or too much time has elapsed, resulting in the impacted files no longer being in the Cache. The buttons will be visible until action has been taken.
Alert Homepage - Alert List

The main portion of the Alerts homepage consists of nine (9) columns:
- Checkbox
 - Check this if you want to select all alerts or select the
  beside specific alerts.
 - ID – This is the number of the alert. ID numbers increase sequentially from the 1st alert generated when the Endpoint is started.
- TIME - Time alert occurred. The timing of the alert could help to narrow down how or by whom the malware was introduced into your system. Formatting is dd-mm-yy hh:mm:ss:ms.
- SEVERITY – The Severity level is defined in the Configuration Profile for a particular endpoint. The levels are Low, Medium, and High. The default Endpoint profile settings are:
- Low for SSH MFA connections.
- Medium severity for attempts at Tampering (Canary Files, File Access, Network Access, malware), Cryptojacking, and HASH rules.
- High severity alerts are generated by ransomware. Assigning alert severity levels is ultimately up to the user.
For more information on setting alert severity, use this link: Applying Policy to a Configuration Profile.
- STATUS - Detected, Killed, Remediated, Success, Suspended.
- Detected – ZeroLock detects system behavior that meets criteria set forth by previously configured Control Policies and Rules.
- Killed - All associated processes are stopped.
- Remediated - The threat processes have been stopped, corruption removed, and all impacted files restored.
- Success - of SSH-MFA login attempts.
- Suspended – The process that triggered the alert is stopped, but no further action is taken. The Administrator is also notified if so configured.
- TYPE – Refers to the type of detection that generated the alert.
 Hash – Ruleset to block actions that meet a specific criterion.
 - Cryptojacking - Ruleset for what criteria and actions are taken when cryptojacking is detected on the Endpoint system.
- File Access – Ruleset on processes is attempting to perform prohibited actions on system files.
- Network Access – Ruleset on what processes can/cannot access the network.
- Program Execution – Ruleset on what processes or commands can or cannot execute specific programs on an Endpoint.
- Ransomware – Ruleset for what criteria and actions are taken when malware is detected on the Endpoint.
- SSH MFA – Ruleset providing granular control of remote access.
- Tampering – Ruleset for what actions are taken when processes are detected that meet the criterion of the rules.
- ENDPOINT ID– This is the identifier of the Endpoint where the threat was detected.
- HOSTNAME - The name of the host on which the Endpoint resides.
- ENDPOINT IP - This is the IP address of the Endpoint where the threat was detected.
- INFO - For an SSH-MFA login attempt, it will be the User identification - User: testuser1 IP:10.0.0.1. For a cyberthreat, it is the number of files affected - E:1 – 45 files affected. For a lockdown rule, it’s the name of the rule violated - MITRE T1041 Block wget.
- ACTIONS– This refers to what actions may be taken regarding that alert. When the alert appears, depending on the Response Type settings in the endpoint's Configuration Profile, there will either be one or two (2) buttons visible in this column.
If the Response Type setting is Do Nothing, you will see two (2) buttons: Kill or Release. Both will be discussed in greater detail below.
Alert - Actions

From this screen, the user has two avenues with which to react to alerts. There is the primary ACTIONS drop-down menu with the list of action options. The second avenue is selecting either Kill or Release, which appear on the same row as the alert.
The primary ACTIONS drop-down menu consists of:
- Kill and Remediate Alert - Kills the processes involved in the malicious behavior, issues an alert, remediates by removing any files created by the malware, removes the malware file(s) themselves, restores any modified or deleted files, removes attempts at persistence (undoing changes to crontabs, removing dropped malware, etc.) and closes all network connections associated with the malicious processes (Default setting).
- Kill Alert - Stops the processes involved in the malicious behavior and generates an alert. Remediation is NOT automatically done.
- Release Alert - Releases the process and allows the system to continue to run. The release function does no file restoration or deletion and should be used when the user believes the alert is a false positive.
- Archive Alert removes an alert from the list. This may be done if the list is getting too long or cluttered. For example, if you do not want to see SSH connection alerts, they can be turned off, but the previous alerts must be archived to remove them from the list.
- Add Allow Rule* lets the user create a rule that allows the process to run and will no longer generate an alert. This is useful for known false positives.
*The Allow Rule creation ability is only for Lockdown rules and not for the Cryptojacking, Ransomware, or Tampering rule types.
Note: The available actions (those not greyed out) depend on the Response Type setting for the Endpoint. For more information: Response Type Settings and Alert Generation.
Again, depending on the Response Type setting, the buttons in the Actions column will be either Kill or Release. Selecting Kill changes the status from Detected to KILLED, and a REMEDIATE tab will appear. Clicking that tab engages the remediation process.


Alert - Detail
Double-clicking an alert opens the details page, displaying the details of an alert. Studying the details allows for a review of the attack process tree and the files touched by the malware.

|
Status |
Displays status of the attack - Detected, Killed, Remediated, Success, Suspended. |
|
Host |
The system’s hostname. |
|
Download Link |
Allows for downloading the alert details in JSON format. |
|
File Tab |
Displays a list of files touched by the malware. Created, modified, or deleted files are listed on this tab. The action column identifies the file interaction, and the Status column displays the file’s current status. |
|
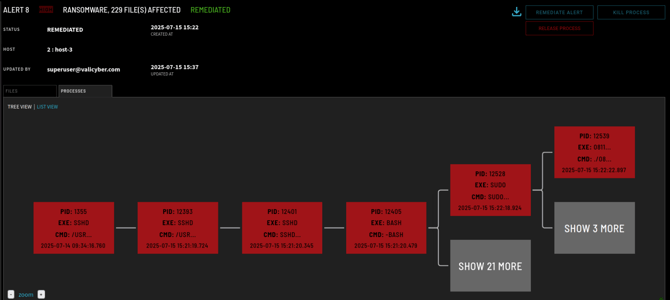
Processes Tab - Tree View |
Graphical representation of the attack process tree. Red blocks indicate a high threat rating and are processes associated with the attack. Each block, if clicked on, shows details concerning the individual process. |
|
Processes Tab - List View |
List of processes in the attack thread. |
On the Alert Details page, three (3) buttons allow individual processes to be addressed: Remediate, Kill Process, or Release Process.

Filter Alert via View
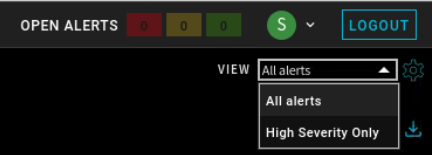
On the right upper corner of the screen is VIEW. The options in the VIEW drop-down list are All alerts or those of High Severity Only.

Export Alert Data
On the left of the screen, directly above the main Actions tab, is EXPORT DATA with a download symbol  . Selecting either will, by default, download all the Endpoint’s alerts in CSV format. If you wish to see only select files, hover the cursor to the left of the file number and select the box that appears. Repeat this process until you have selected the files you want, then use either download option.
Note: The user's assigned role must have the Download Reports option enabled.

Files View
The details for an alert are provided for the files involved and for any associated processes. In the Files view, files impacted can be viewed in list format, while the processes involved will be in both tree and list formats. 
Process List View
The Process List view provides information for all the processes involved in the alert.

Process Tree View
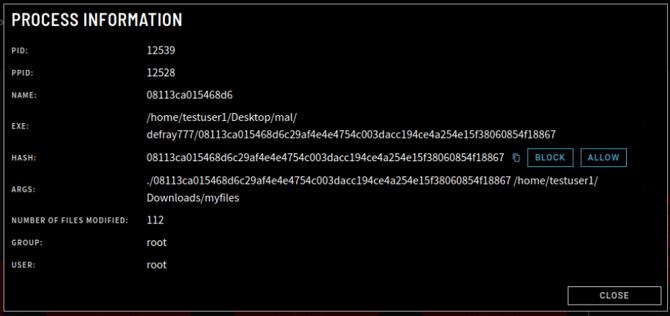
In the Tree view, individual processes are represented by red and grey rectangles that, when opened, provide details of that process. Red indicates a high threat presence as they are deemed malicious. In the image below, selecting the red rectangle on the far left will bring up the Process Information screen, providing details on that particular process.

Process Information View
The Process Information screen for a particular process includes everything in the list view, the Parent Process ID (PPID), port designations on which connections were received, the Group identifier, the User, and the Endpoint ID.
To the right of the HASH checksum are two (2) boxes, BLOCK and ALLOW, which create HASH rules that are applied to all Policies.
- BLOCK enables a user to prevent a process with that HASH from ever running in that configuration.
- ALLOW is normally used when a process ZeroLock has alerted to is deemed benign and considered a false positive. This process will always be allowed to run. Using ALLOW, the customer will override the ZeroLock detection and "allow" that process to run without generating alerts in the future.

This concludes the introduction to the Alerts Homepage on the ZeroLock® Management Console.